Horizontal Flow Hive - The South East Scarp Solution

I have been working on the engineering issues of creating a horizontal flow hive for some time and have the hive almost complete 90%+, only painting and cosmetics left to do.

The design issues shouldn’t be underestimated, especially as my criteria required the ability to move the flow frames as the brood frames were expanded and contracted in the traditional manner.

The criteria included:

  • Flow frames at each side of the brood frames.
  • Flow frames must be movable.
  • Viewing of all frames from front and rear.
  • Follower boards with viewing ports.
  • Use standard Australian timber sizes and profiles.
  • Minimum machining of timber.
  • Glue and screw construction.
  • Tasmanian Oak and AA Grade Marine Ply were the main timbers used.

Anyone who has assembled a vertical flow frame hive will have identified that the flow frames and Langstroth frames are different lengths, widths and depths.

The differences between frames created an interesting engineering problem which I have overcome by designing a horizontal hive that takes both types of frames side by side.

The front of the hive was built with a single full-length piece of perspex viewing port which allows observation of the bees across the entire front, including the flow frames. The 6mm bee space at the front of the hive is maintained irrespective of the frame being Langstroth or Flow.

At the rear of the hive, I have resolved the problem of different frame lengths by creating modular perspex plates in widths of 50mm, 100mm and 150mm. These plates align with the flow frames to make the rear wall. I could have chosen widths that better correspond with the width of the Langstroth frames, however, being lazy I decided to stick with flow frame width. This also occurred because I had already had the plastic plates professionally cut prior to determining all the dimensional problems. The Langstroth frames maintain a 6mm bee space between the frame and the back wall plates.

I was faced with the problem of alignment across the top of the flow frames and the top of the Langstroth frames. I have designed spacers to lift the Langstroth Frames close to level with the flow frames. As part of this solution, I have provided bee space at the top and the bottom of the frames at approximately 10mm.

The follower boards either side are constructed with perspex windows to allow for checking of the end frames without disturbing the bees. A 6mm space is maintained between both the Langstroth and flow frames and the follower board.

The front, rear and side viewing windows have white Coreflute covers to provide insulation. The inside of the Coreflute panels are painted black to block light and can be reversed in winter to increase the ambient hive temperature through heat absorption from sunlight.

I have provided a unique combination entry with a landing board and circular horizontal entry ports through to a wire mesh intermediate zone that leads into a long bottom entry into the hive. This unique combination of horizontal to vertical entry has been designed to provide maximum protection for the bees from the strong winds (greater than 110Kph) that occur in this region in summer and winter. The vertical entry also provides the bees with the ability to regulate the hive temperature without being compromised by the entry panels and tunnels.

The entry point is offset from the hive in an attempt to reduce stress on the guard bees when removing and replacing the front cover. Removing the front cover allows light through the hive while doing external inspections of the brood frames. The entry slot is opened and closed by using covering strips as the frames are inserted and removed over the yearly cycle. The open entry slot does not extend past the queen excluder and as such all entry and exit to the flow frames is through the queen excluder internally.

The original design provided for a pitched roof, however, this increased windage was on reflection considered too risky to the stability of the hive in strong winds and I have since resolved that a flat roof will do as there is sufficient space between the top cover boards and the hinged lid for the cover boards in all configurations.

The whole hive is / will be painted in a white external paint.

I will add more pics and comments to the thread when the final touches are complete and when bees are introduced.

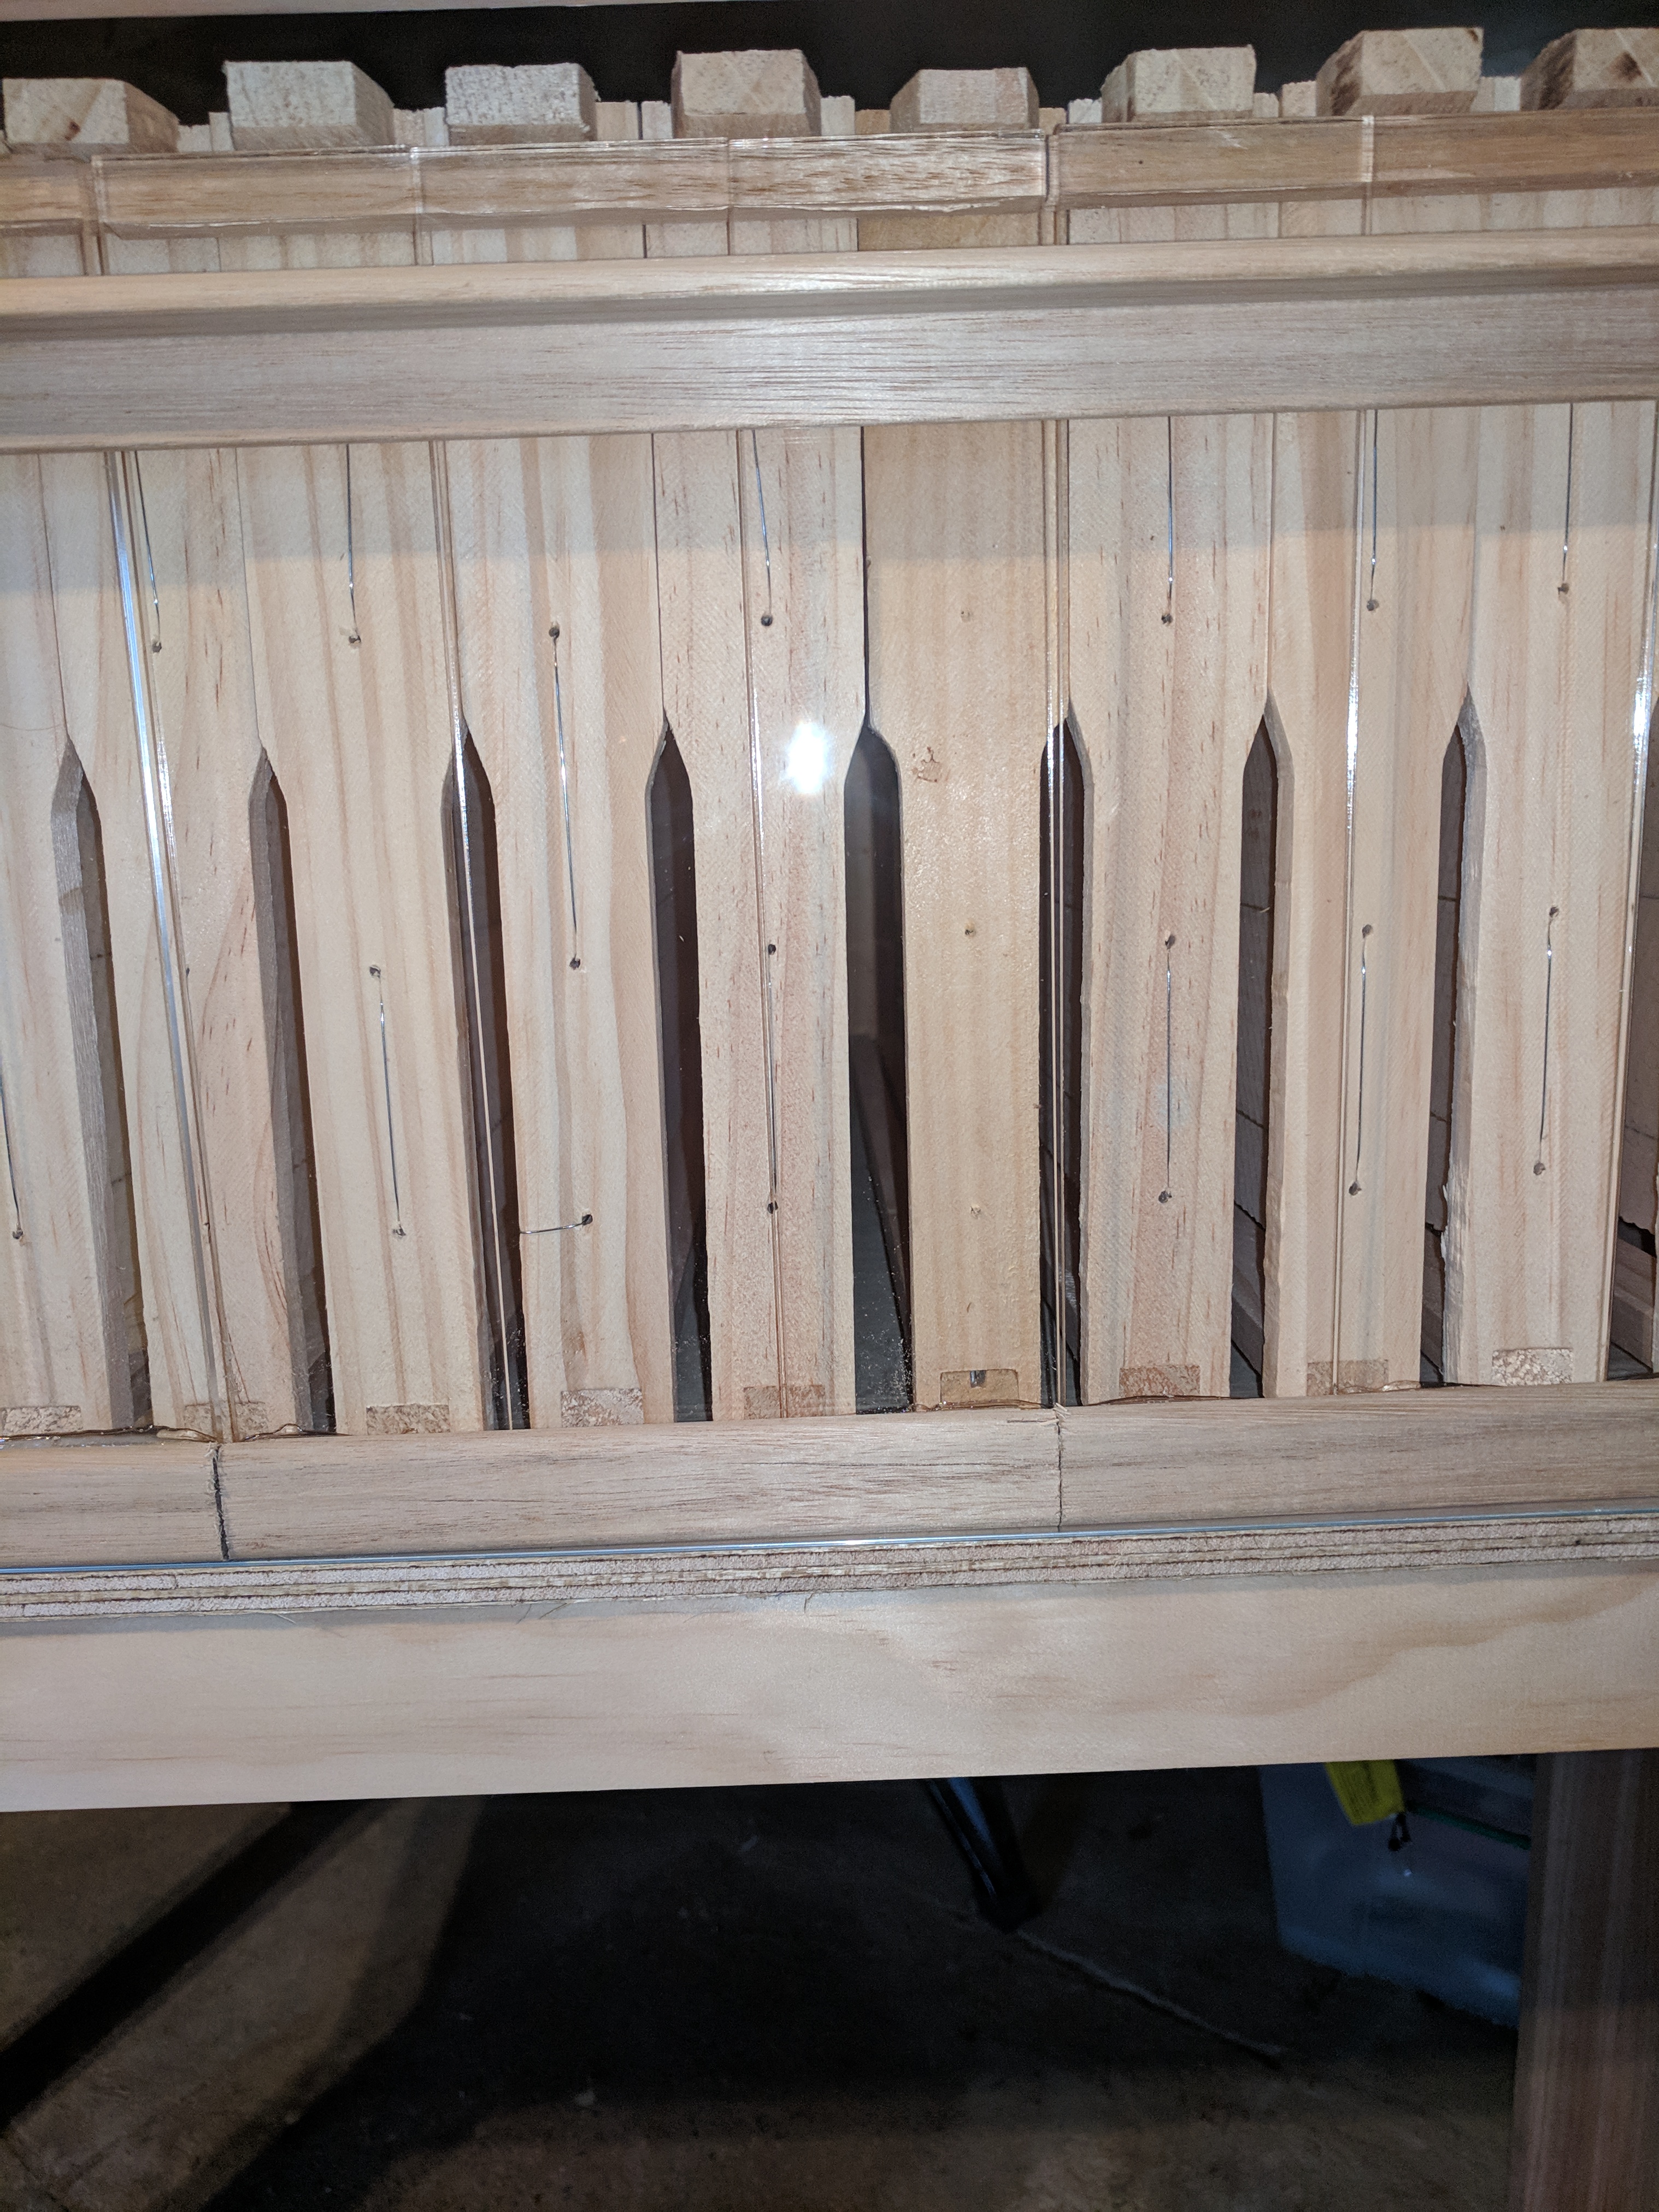
Frames and Follower Boards in the central location, view from rear of hive

A closer view of the rear of the hive. These modular panels align with the flow frames when fitted.

Top cover boards in place. There is a minimum of 10mm between the top of the frames and the bottom of the cover boards to allow efficient movement of the bees.

The follower boards have a large viewing plate and are designed to mate with the rear end plates of the brood frames to create a mechanically strong joint.

View from the front. I have deliberately chosen the circular plates for ease of reducing and expanding the entry of the hive to reduce robbing etc. I have guestimated the number of entries and will, in time, make observation related to issues of the number of ports required to reduce congestion and maximise throughput.

Note that the landing board and entry is offset from the front side of the hive. I have considered extending this further from the hive however I want to test the bee reaction at this distance before doing so. The bottom entry slot appears as a black line on the right behind the perspex, which still has its protective cover on. The bees enter from the left, travel through a short timber tunnel into an open area protected by a mesh screen which they can climb to enter the hive vertically.

The cost of this hive is excessive in comparison to standard Langstroth and Flow Hives, it is, after all, a prototype. The number of individual components would be reduced in a commercial timber workshop.

My scientific and research background lead me to these unique design solutions and I look forward to discussion and debate on the merits of each and am excited that I will soon have bees field testing.

My solutions are not public domain and I reserve all rights to my designs and intellectual property as far as they can be protected by law.

If someone builds a similar hive using my design solutions for non-commercial personal use, all I ask is that you reference me as the solution provider and send me some pics.

If someone, including Flow, wishes to commercialise my design solutions, I am happy to chat and discuss some form of recompense for use of my intellectual property :slight_smile:

I have identified and implemented unique design solutions to the previously unresolved issue of the co-existence of Langstroth frames and flow frames. My unique solutions allow a horizontal hive to be managed as per traditional methods without compromise. The front viewing window has debatable benefit, however, the side and rear viewing windows allow for limited management of the hive without disturbing the bees.

I look forward to comments and future reports, once the bees have been introduced.

Terry

6 Likes

Hive looks great and look forward to seeing photos with the flow frames installed.
As to the distance from entrance to hive, for my observation hive the bees walk approximately 1.2m through tubing. Whether they like it or not, who knows, but they do it. Each trip takes 12-15 seconds so in the long term this would equate to a significant loss of productivity and as my hive still has very low numbers I haven’t seen what effect congestion in the walkway will have.

1 Like

There’s probably no need to include the landing board.

1 Like

Correct me if I am wrong but am I seeing that you don’t use the brass ferals in the wiring holes of the frames and the wire has cut into the timber?
Also am I seeing foundation in wired frames with the foundation not embedded?
I like your approach on the subject and the issues involved. Playing the devils advocate, have you considered a shorter route for the bees from landing to actually being inside the hive area. I agree with JeffH about if there is a real need for a landing board? Finally have you inquired about the plywood possibly containing formaldehyde which is used in the glues used in some plywood construction? The fumes given off is constant through the life of the glue and will kill a colony of bees.
Food for thought, and possibly overlooked with all the slide rule activity.
Regards

I never used those brass eyelets. I believe they are on the list of things that @JeffH never bothered using either (along with landing boards, frame grabbers, frame rests,etc :wink: )? The wire does cut into the timer a little- but does tat matter? I use a jig to wire my frames and they are nice and tight. Putting in all the eyelets seems like a pain I can do without.

@SouthEastScarp Interesting design- please keep us updated on how it performs. Please don’t take this th wrong way but I am going to play devils advocate here: I have a long hive with flow frames and mine is doing well- though we are having a poor honey season this year and to date none of the hives at that location have any excess stores of honey. Your hive does seem like it has a lot of additional complexity: I am not sure that it will pay off. For instance: moving the flow frames adds more work but may not result in any more honey. It must have been difficult to come up with a way to access the rear of every flow frame for harvesting? How do you remove the plugs and insert the key? Is your solution bee proof?

When I designed my hive I made follower boards and the idea was the hive size can be easily reduced/expanded. However I soon found that the entire thing was full of bees from end to end within a few months and there is no need to ever expand or shrink it again. So after those first two months I have never touched any of my follower boards again. The only reason I may shrink it is if it swarmed or went queenless for a period. In those instances I wouldn’t be expecting any excess honey until I had built it back up again. Having flow frames at one end- I can shrink the hive easily from the other by just moving one board. The whole point of a horizontal hove is that it should make frame manipulation and inspections easier with no boxes to be lifted off. Beyond that I am not at all sure there is any advantage to a long hive.

When your hive is still in it’s expansion phase- I am not sure if the bees would put much honey in the flow frames- as they will be busy building combs. I wouldn’t really want to take any honey until the bees had filled out their entire brood space and were at maximum productive capacity… So whilst I think your idea is interesting- It remains to be seen if it will be practical.

Still- I hope I am proved wrong and your design works as intended!

3 Likes

Hi @Brad13 don’t forget bees live in a three-dimensional world where walking on the ceiling or walls is not really any harder than walking on the floor, providing the spacing is sufficient for them to pass.

1 Like

There’s probably no need to include the landing board.

True @JeffH. it is all about trying to help the guards to look forward and not back :slight_smile:

The bees in the current hive regularly hit the vertical front wall of the flow hive and fall off. It may just be bad genetics, but at least with the landing board they only fall a couple on inches instead of onto the ground where no doubt there will be a bob-tail lizard or two wanting some easy protein :slight_smile:

Hi @Peter48

There is no brass around here :slight_smile:

A trick of having so much light entering from the front and rear, what you are actually seeing IS the wire embedded in the wax :slight_smile:

I suppose that the only way I am going to find out if there will be outgassing of the ply will be if the colony struggles or falters. The paint I am using may prevent any outgassing. All the timber, including the ply will be well coated with paint and sun-cured by the time my new queen arrives. Thanks for the heads up though as I will now have an excuse if the experiment fails.

1 Like

Time will tell, once I have bees in the hive. It is certainly designed to only allow bees in and out at the correct point.

It is more complex than a standard box, but the flow team created a product that required an elegent solution to marry standard frames and flow frames into the same horizontal plane that allows for good horizontal hive management. I will admit that the flow design team did an excellent job of making it difficult, but not impossible to do.

The clear plates at the back of the hive line up perfectly edge to edge with the rear plate of the flow frames. This is the crux of the whole design and why the solution appears so complex, yet it is in reality elegantly simple.

Access to the key slot and plug is less difficult than in a flow super as there is only one cover that goes over the whole rear of the hive to block out light and provide insulation. In addition, my hive allows a greater area of the flow frame to be viewed than a flow super. Only the top 15mm of the top of the flow frame is obscured.

The guide bar, that runs across the back of the hive, does not need to support any downforces caused by the weight of the flow or brood frames.

My hive management philosophy is to expand in two directions at once. In place brood frames do not have to be disturbed to add frames. If the bees fill the available space and maintain that strength over the winter period that would be good, but there are few locations where a colony can stay at full strength over winter, I observed a drop in bee numbers and activity here on the scarp last winter and would expect that to be the norm.

If the bees are not fully utilising the frames then it is worth packing them down a bit by removing a couple of frames to ensure that they use the flow frames for honey storage and not turning brood frames into honey stores at the expense of the flow frames.

The Flow Frames, slide along the same as the follower boards, they are not fixed in place. It is possible to put frames to the inside of the queen excluder for brood or to the outside of the flow frames for cut comb honey production if desired. The solution offers the greatest amount of flexibility in how the hive is managed.

Last autumn I left one full flow frame for the girls along with the 5 empty flow frames. They didn’t use the honey in the flow frame and ended up with honey stores increasing in the other flow frames slightly over the winter. That was on a single 8 frame brood box. What will winter be like if there were 21 brood frames? I might even get a winter harvest :slight_smile:

While answering your questions I decided that I will make the top covers, that sit between the frames and the roof, out of perspex. Observing the bees from the top will assist in determining bee activity to help in hive management. Thanks @Semaphore

1 Like

interesting- and many good points.

In practice I can easily reduce the size of my hive by just placing the follower board at the opposite end to the flow frames. And I will possibly do that next winter for the reasons you mentioned. I can also move my QX so can put brood frames on the flow side to rotate them out or harvest them as honey. I already get good honeycomb at the other end in season- even without a QX as the queen never seems to travel to the far ends. I think it might even be possible to get along without a QX but don’t want to risk trying.

If you do that: be sure there is not enough bee space between the top f the frames and the covers: if there is the bees will glue that perspex on to the frames with bridge comb. In my hive the gap is only around 1 cm but I had real issues with the bees heavily gluing the frames to the covers with honeycomb.I believe this is far more of an issue with long hive than standard ones. I have 4 inner covers- and when this happened to me- when I tried to lift one out- it lifted the 5 frames below with it- they were glued as one- as each cover covers less frames the chance of the frames lifting up with the cover increase- a lot. Also with a long hive generally you can’t slide/rotate the covers into place- you have to liftm them straight up and out- which means bees can and will get squashed on the cover rests: the solution to that is to have the covers only sit on a few points- and only sitting on very thun rests… I resolved the issue of the bridge comb completely by using vinyl hive mat sections- but you won’t want that if you have clear viewing covers. I actually love those hive mats- as they keep every frame except the ones I am inspecting covered- inspecting the long hive is always very relaxed- bees never get upset. that’s one of the great advantages of the design. Another advantage of the hive mats is they trap the heat at the top of the comb- and mimic a natural hive where the bees can’t walk to the top of every comb… the bees propolise the mats making a very good seal with every frame- and I believe proplis is the bees ‘antibiotic’ and ‘immune system’…

I assume you have looked at my long hive on this forum already?

Many ways to crack an egg. Look forward to seeing how you go with your solution.

Regarding clear covers you will need to place some sort of insulated cover over the top too. One of my friends is using them in a long lang without flow frames.

Adam

I don’t use any landing boards unless they are on hives that were given to me. One flow hive for example.

I take it that you are joking when you say “My solutions are not public domain and I reserve all rights to my designs and intellectual property as far as they can be protected by law”.

It was a hook Jeff :wink:

1 Like

Tempered glass by the look @AdamMaskew. The thermal properties of glass and perspex are very different, with plastic being a better insulator.

I may install some additional insulation in the winter, however, it rarely gets as cold here as it does down your way.

Hive all ready to go. The only delay is Jack sending me a message that my new queen is ready to collect.

I am sure she will appreciate her new home :slight_smile:


View South


View South


View West

IMG_20181226_112515
View Southeast


View Northeast


View East


View from the bottom of the garden


It really is a Bee Palace on the Hill :slight_smile:

6 Likes

I thought that I would put up a couple of pictures of the hive entry


Looking from the back to the entry the bees will pass through the entry disks, only one is currently open, into the intermediate tunnel which opens to a mesh area which turns 90 degrees to the hives bottom entry.


Hive entry is vertical, It is possible to see the bottom of the frames through the mesh, just under the aluminum strip.

The bees can do their thing to maintain the hive temperature and humidity through the long vertical entry slot while the minimum number of bees will be required for entry protection. The mesh also provides another point of view to determine where the prime bee activity is occurring and possibly a guide to the location of the queen.

We have a big problem with feral bees trying to rob my current vertical hive during dearths and expect this to continue to be an issue in this hive. Bee wars are a part of life and my current bees get aggressive to everyone and everything during these periods. By using the entry disks I can help to control hive entry without interfering with the humidity and temperature inside the hive. By taking a peek underneath I can also determine if there is a need to open or close entry ports during the annual cycle of expansion and contraction in bee numbers.

We have very strong west, south-westerly, winter, and easterly, summer, gales blowing across the scarp. I have regularly recorded wind speeds in excess of 100 kilometres per hour during these events. My current vertical hive is located in a protected spot with the entry facing south, the new horizontal hive has the entry on the western side and is fully exposed.

This is, of course, an experimental hive and all my theories will be put to the test once I get some bees inhabiting the hive.

3 Likes

Brood frames need managing to keep the bees healthy and reduce the chances for disease.

One of the goals has always been to manage the horizontal hive so that all excess honey stores go into the flow frame and the only honey not in the flow frames is in the honey arch in the corners of the brood frames.

If only honey and no pollen or brood are being stored in the outer frames against the Qx then they should be removed and the hive collapsed to encourage storage in the flow frames.

If a full brood pattern and or pollen is being stored in the outer frames then new frames should be added to allow the colony to expand.

Being able to move the flow frames as brood frames are added and removed is an important design consideration to achieve the maximum utilisation of the flow frames and provide the greatest management flexibility.

New brood frames will always be placed toward the outsides against the Qx and then rotated toward the centre over time as part of the hive management process.

The old centre frames are removed and placed between the Qx and Flow Frame either side to allow bees to hatch, without the Queen being able to lay any new eggs in the old frame. The now depleted frame is then removed from service and the old wax removed and the frame recycled.

SESHH%20-%20Brood%20Frame%20Management%20Plan

4 Likes

Installed the Nuc today.

Thanks, @skeggley for bringing them down the scarp to my place, they really were a pleasure to transfer.

Back cover removed after installation for a look through the back window. The girls are exploring the bee space between the back wall and frames.

As I expected some of the girls are a little confused as to how to get back in. I expect that they will work it out over the next couple of days and then only potential robbers will be getting confused by the mesh under the inner hive entry.

As can be seen here the girls out the front are orientating quite well, there is a stream of bees exiting and entering correctly through the front entry.

This is a very long, boring and unedited video of transferring the girls to their new home. It is not narrated and has a number of shots with nothing happening as I wander around doing bits and pieces.

The girls really behaved themselves during the transfer, Greg was confident that they were gentle and as you can see, they were never even bothered by my rough handling.

Happy to take comments, criticisms and questions here or on YouTube.

Terry

3 Likes

See I told you that one that made me run like a sissy wasn’t from my lot…
Good to hear you got them transferred without a hitch. Did you spot the queen?

1 Like

My other hive is a bit hot so I’ll accept that the cranky bee was from my hive, not one of yours :slight_smile:

1 Like